
Axboot 신규화면 만들기 7 - 중복등록체크로직 추가 -2 소스구현

3. 실제 구현
: 이번시간에는 앞에서 설명한 대로 실제 중복체크기능을 어떻게 구현할지 소스를 보면서 설명하도록 하겠습니다.
1) javascript(product.js)에서 로직 추가
var fnObj = {};
var ACTIONS = axboot.actionExtend(fnObj, {
    PAGE_SEARCH: function (caller, act, data) {
        axboot.ajax({
            type: "GET"
            , url: ["product"]
            , data: caller.searchView.getData()
            , callback: function (res) {
                //중복기능추가용: 조회할때 기존 조회건인지를 확인하기 위해 __searched__ 속성을 더 붙여준다.
                for (var i = 0; i < res.list.length; i++) {
                    res.list[i].__searched__ = true;
                }
                caller.gridView01.setData(res);
            }
        });
        return false;
    }
    , PAGE_SAVE: function (caller, act, data) {
        var saveList = [].concat(caller.gridView01.getData("modified"));
        saveList = saveList.concat(caller.gridView01.getData("deleted"));
        axboot.ajax({
            type: "PUT"
            , url: ["product"]
            , data: JSON.stringify(saveList)
            , callback: function (res) {
                ACTIONS.dispatch(ACTIONS.PAGE_SEARCH);
                axToast.push(LANG("onsave"));
            }
            , options: {
                onError: function (err) {
                    //{"message":"신규로 추가하신 [제품코드]코드는 이미 등록된 제품코드입니다."}
                    axDialog.alert({
                        title: "Error"
                        , theme: "primary"
                        , width: 450
                        , msg: err.message
                    });
                }
            }
        });
    }
    , ITEM_ADD: function (caller, act, data) {
        caller.gridView01.addRow();
    }
    , ITEM_DEL: function (caller, act, data) {
        caller.gridView01.delRow("selected");
    }
});
var CODE = {}; //추가
// fnObj 기본 함수 스타트와 리사이즈
fnObj.pageStart = function () {
    //
    var _this = this;
    axboot
        .call({
            type: "GET"
            , url: "/api/v1/commonCodes"
            , data: {
                groupCd: "ORIGIN"
            }
            , callback: function (res) {
                var originList = [];
                res.list.forEach(function (n) {
                    originList.push({
                        CD: n.code
                        , NM: n.name + "(" + n.code + ")"
                    });
                });
                this.originList = originList;
            }
        })
        .done(function () {
            CODE = this; // this는 call을 통해 수집된 데이터들.
            //위쪽 추가
            _this.pageButtonView.initView(); // this --> _this 로 변경
            _this.searchView.initView(); // this --> _this 로 변경
            _this.gridView01.initView(); // this --> _this 로 변경
            ACTIONS.dispatch(ACTIONS.PAGE_SEARCH);
        }); //추가
};
fnObj.pageResize = function () {};
fnObj.pageButtonView = axboot.viewExtend({
    initView: function () {
        axboot.buttonClick(this, "data-page-btn", {
            "search": function () {
                ACTIONS.dispatch(ACTIONS.PAGE_SEARCH);
            }
            , "save": function () {
                ACTIONS.dispatch(ACTIONS.PAGE_SAVE);
            }
        });
    }
});
//== view 시작
/**

 * searchView

 */
fnObj.searchView = axboot.viewExtend(axboot.searchView, {
    initView: function () {
        this.target = $(document["searchView0"]);
        this.target.attr("onsubmit", "return ACTIONS.dispatch(ACTIONS.PAGE_SEARCH);");
        this.filter = $("#filter");
    }
    , getData: function () {
        return {
            pageNumber: this.pageNumber
            , pageSize: this.pageSize
            , filter: this.filter.val()
        }
    }
});
/**

 * gridView

 */
var list = [];
fnObj.gridView01 = axboot.viewExtend(axboot.gridView, {
    initView: function () {
        var _this = this;
        this.originList = CODE.originList; //추가
        this.target = axboot.gridBuilder({
            showRowSelector: true
            , frozenColumnIndex: 0
            , sortable: true
            , multipleSelect: true
            , target: $('[data-ax5grid="grid-view-01"]')
            , columns: [{
                    key: "prdtCd"
                    , label: "제품코드"
                    , width: 100
                    , align: "center"
                    , editor: "text"
                }, {
                    key: "prdtNm"
                    , label: "제품명"
                    , width: 200
                    , align: "center"
                    , editor: "text"
                }, {
                    key: "origin"
                    , label: "원산지"
                    , width: 100
                    , align: "center"
                    , editor: {
                        type: "select"
                        , config: {
                            columnKeys: {
                                optionValue: "CD"
                                , optionText: "NM"
                            }
                            , options: this.originList //추가
                            /*

                            [

                        {"CD":"KR","NM":"한국(KR)"},

                        {"CD":"US","NM":"미국(US)"},

                        {"CD":"JP","NM":"일본(JP)"}

                            ]

                             */
                        }
                    }
                }, {
                    key: "purchasePrice"
                    , label: "매입가격"
                    , width: 150
                    , align: "right"
                    , editor: "number"
                }, {
                    key: "salesPrice"
                    , label: "판매가격"
                    , width: 150
                    , align: "right"
                    , editor: "number"
                }

            ]
            , body: {
                onClick: function () {
                    this.self.select(this.dindex, {
                        selectedClear: true
                    });
                }
            }
        });
        axboot.buttonClick(this, "data-grid-view-01-btn", {
            "add": function () {
                ACTIONS.dispatch(ACTIONS.ITEM_ADD);
            }
            , "delete": function () {
                ACTIONS.dispatch(ACTIONS.ITEM_DEL);
            }
        });
    }
    , getData: function (_type) {
        var _list = this.target.getList(_type);
        if (_type == "modified" || _type == "deleted") {
            list = ax5.util.filter(_list, function () {
                return this.prdtCd;
            });
        } else {
            list = _list;
        }
        return list;
    }
    , addRow: function () {
        this.target.addRow({
            __created__: true
            , origin: "KR"
        }, "last");
    }
    , delRow: function delRow(_type) {
        this.target.deleteRow(_type); //여기서 무조건 deleteList에 추가해주고 있는것 같다.
        //그렇다보니 기존 조회된 데이터가 아닌 신규로 추가한 후 삭제해도 추가되기 때문에
        //저장시 안넘어가도 되는 데이터(화면상에서만 행추가후 삭제시)까지 날라간다.
        //중복기능추가시: 조회된것이 아닌경우 deleteList에서 빼준다.
        for (i = 0; i < this.target.deletedList.length; i++) {
            if (this.target.deletedList[i].__searched__ == undefined) {
                this.target.deletedList[i] = null;
            }
        }
    }
});
2) Controller(ProductController) 에서 로직 추가
package com.dasdes.shopmng.controllers;

import com.chequer.axboot.core.api.ApiException;
import com.chequer.axboot.core.api.response.ApiResponse;
import com.chequer.axboot.core.api.response.Responses;
import com.chequer.axboot.core.controllers.BaseController;
import com.chequer.axboot.core.parameter.RequestParams;
import com.dasdes.shopmng.domain.prdt.Product;
import com.dasdes.shopmng.domain.prdt.ProductService;
import com.wordnik.swagger.annotations.ApiImplicitParam;
import com.wordnik.swagger.annotations.ApiImplicitParams;
import java.util.List;
import javax.inject.Inject;
import org.springframework.stereotype.Controller;
import org.springframework.web.bind.annotation.RequestBody;
import org.springframework.web.bind.annotation.RequestMapping;
import org.springframework.web.bind.annotation.RequestMethod;

@Controller
@RequestMapping(value = "/api/v1/product")
public class ProductController extends BaseController {

  @Inject private ProductService productService;

  @RequestMapping(method = RequestMethod.GET, produces = APPLICATION_JSON)
  @ApiImplicitParams({
    @ApiImplicitParam(name = "prdtCd", value = "제품코드", dataType = "String", paramType = "query"),
    @ApiImplicitParam(name = "prdtNm", value = "제품명", dataType = "String", paramType = "query"),
    @ApiImplicitParam(name = "filter", value = "검색어", dataType = "String", paramType = "query")
  })
  public Responses.ListResponse list(RequestParams<Product> requestParams) {

    List<Product> list = productService.gets(requestParams);

    return Responses.ListResponse.of(list);
  }

  @RequestMapping(
      method = {RequestMethod.PUT},
      produces = APPLICATION_JSON)
  public ApiResponse save(@RequestBody List<Product> request) {

    // 중복체크 후 중복발생 시 Exception핸들러로 받는다.

    try {

      productService.savePrdt(request);

    } catch (ApiException e) {

      return handleApiException(e);
    }

    return ok();
  }
}
3) ProductService 에서 로직 추가
package com.dasdes.shopmng.domain.prdt;
import com.chequer.axboot.core.api.ApiException;
import com.chequer.axboot.core.parameter.RequestParams;
import com.dasdes.shopmng.domain.BaseService;
import com.querydsl.core.BooleanBuilder;
import java.util.List;
import javax.inject.Inject;
import org.springframework.stereotype.Service;
import org.springframework.transaction.annotation.Transactional;
// import org.slf4j.Logger;
// import org.slf4j.LoggerFactory;
@Service
public class ProductService extends BaseService<Product, String> {
// private final Logger logger = LoggerFactory.getLogger(ProductService.class);
private ProductRepository productRepository;
@Inject
public ProductService(ProductRepository productRepository) {
super(productRepository);
this.productRepository = productRepository;
}
public List<Product> gets(RequestParams<Product> requestParams) {
String prdtCd = requestParams.getString("prdtCd", "");
String prdtNm = requestParams.getString("prdtNm", "");
String filter = requestParams.getString("filter");
BooleanBuilder builder = new BooleanBuilder();
if (isNotEmpty(prdtCd)) {
builder.and(qProduct.prdtCd.eq(prdtCd));
}
if (isNotEmpty(prdtNm)) {
builder.and(qProduct.prdtNm.eq(prdtNm));
}
List<Product> prdtList =
select()
.from(qProduct)
.where(builder)
.orderBy(qProduct.prdtCd.asc(), qProduct.prdtNm.asc())
.fetch();
if (isNotEmpty(filter)) {
prdtList = filter(prdtList, filter);
}
return prdtList;
}
@Transactional
public void savePrdt(List<Product> product) {
Product prdt = null;
for (int i = 0; i < product.size(); i++) {
prdt = (Product) product.get(i);
// 신규추가된 데이터에 대해 기존에 있는데이터인지 체크
if (prdt.isCreated() && exists(prdt.getId())) {
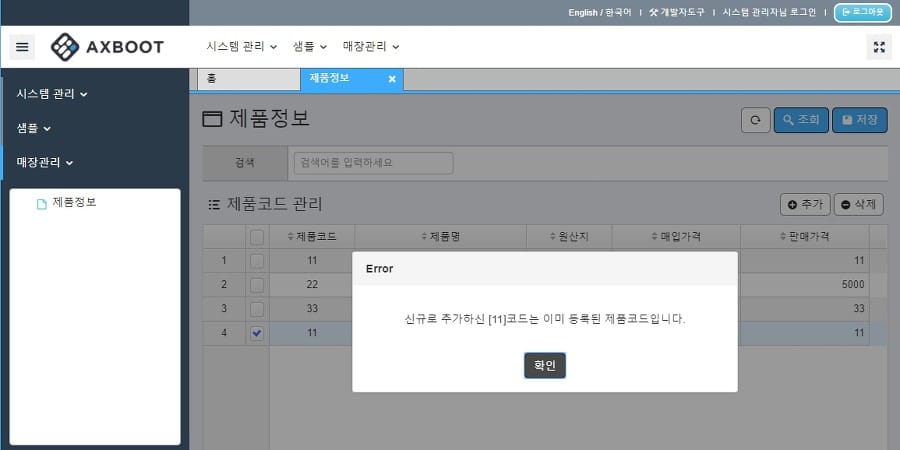
throw new ApiException("신규로 추가하신 [" + prdt.getId() + "]코드는 이미 등록된 제품코드입니다.");
}
}
save(product);
}
}
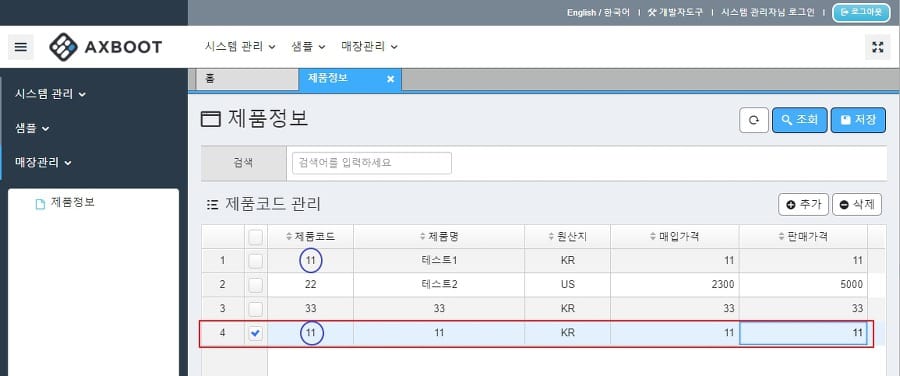
4) 최종결과확인
: 위와같이 소스를 수정하고 서버를 재기동 후 중복제품코드를 추가해서 입력해본다.
어때요? 도움이 많이 되셨나요? ~~~~~~~
#full stack framework #Axboot화면만들기 #Axboot 사용법 #Axboot매뉴얼 #axboot강좌 #axboot 중복등록체크


![[세입자]전세 계약 체크사항](/content/images/size/w600/2025/09/apartment.jpg)


