
Tensorflow를 이용한 이미지 인식

1. 사전준비
1) Tensorflow 1.7 설치
: inception V3를 실행하기 위해 tensorflow 는 1.7 버전 이상을 설치해야 검증(TEST)시 오류가 나지 않는다.
앞 강좌에서 설치한 Tensorflow 1.6을 1.7로 업그레이드 후 진행한다.
아래 명령어 실행시 앞서 설치한 python 3.5에 맞는 tensorflow는 1.7 까지 가능하므로 1.7을 설치하겠다.
pip install "tensorflow==1.7.0"
pip install "tensorflow-gpu==1.7.0"
D:\ML2\inception\example_code>pip install "tensorflow==1.7.0"
Collecting tensorflow>=1.7.0
Downloading https://files.pythonhosted.org/packages/af/5b/695e2e66feb27742a78f938d8369cc874b5fc7082193c3352c9db599af01/tensorflow-1.11.0-cp35-cp35m-win_amd64.whl (46.9MB)
55% |################# | 26.1MB 93kB/s eta 0:03:43
D:\ML2\inception\example_code>pip install "tensorflow-gpu==1.7"
Collecting tensorflow-gpu==1.7
Downloading https://files.pythonhosted.org/packages/57/9a/81144ee2cdf50c6e7e5ee3e17e2d05dc26173eced2f1696aa986c0b58f57/tensorflow_gpu-1.7.0-cp35-cp35m-win_amd64.whl (86.7MB)
17% |##### | 15.4MB 229kB/s eta 0:05:12
*참고 : tensorflow 1.6 에서 TEST를 실행하면 아래와 같은 오류가 발생한다.
python label_image.py --graph=D:/tmp/output_graph.pb --labels=D:/tmp/output_labels.txt --input_layer=Placeholder --output_layer=final_result --image=D:/ML2/inception/flower_photos/daisy/21652746_cc379e0eea_m.jpg
Caused by op 'import/module_apply_default/InceptionV3/InceptionV3/Mixed_7b/Branch_1/Conv2d_0a_1x1/Conv2D/ReadVariableOp', defined at:
File "label_image.py", line 118, in
graph = load_graph(model_file)
File "label_image.py", line 33, in load_graph
tf.import_graph_def(graph_def)
File "D:\ML_Program\Python35\lib\site-packages\tensorflow\python\util\deprecation.py", line 432, in new_func
return func(*args, **kwargs)
File "D:\ML_Program\Python35\lib\site-packages\tensorflow\python\framework\importer.py", line 553, in import_graph_def
op_def=op_def)
File "D:\ML_Program\Python35\lib\site-packages\tensorflow\python\framework\ops.py", line 3271, in create_op
op_def=op_def)
File "D:\ML_Program\Python35\lib\site-packages\tensorflow\python\framework\ops.py", line 1650, in __init__
self._traceback = self._graph._extract_stack() # pylint: disable=protected-access
2) 소스 내부적으로 tensorflow_hub 모듈을 사용하므로 pip install tensorflow_hub 명령어로 모듈을 설치하자.
D:\ML2\inception\example_code>pip install tensorflow_hub
Collecting tensorflow_hub
Downloading https://files.pythonhosted.org/packages/5f/22/64f246ef80e64b1a13b2f463cefa44f397a51c49a303294f5f3d04ac39ac/tensorflow_hub-0.1.1-py2.py3-none-any.whl (52kB)
100% |################################| 61kB 833kB/s
Requirement already satisfied: protobuf>=3.4.0 in d:\ml_program\python35\lib\site-packages (from tensorflow_hub) (3.5.2.post1)
Requirement already satisfied: six>=1.10.0 in d:\ml_program\python35\lib\site-packages (from tensorflow_hub) (1.11.0)
Requirement already satisfied: numpy>=1.12.0 in d:\ml_program\python35\lib\site-packages (from tensorflow_hub) (1.14.3)
Requirement already satisfied: setuptools in d:\ml_program\python35\lib\site-packages (from protobuf>=3.4.0->tensorflow_hub) (28.8.0)
Installing collected packages: tensorflow-hub
Successfully installed tensorflow-hub-0.1.1
3) 학습용 이미지 다운로드
- 폴더를 구분하여 폴더명 아래에 관련이미지들을 넣으면 본인이 원하는 이미지로 학습이 가능하다
- 아래 경로에서 샘플사진들을 받아 압축을 푼다.
- 다운로드 링크 : https://download.tensorflow.org/example_images/flower_photos.tgz
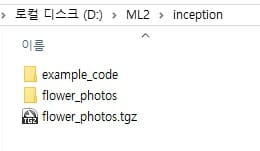
- 저자의 경우 D:\ML2\inception\ 하위경로에 압축을 풀기로 한다.
- 저자의 폴더구조는 다음과 같다.\
4) 학습과 테스트를 위한 소스코드 다운로드
: 저자의 경우 위 폴더 중 example_code 폴더 內에 다운로드 하였음.
- 학습용 소스코드 다운로드
: https://github.com/tensorflow/hub/raw/master/examples/image_retraining/retrain.py
- 테스트용 소스코드 다운로드
: https://github.com/tensorflow/tensorflow/raw/master/tensorflow/examples/label_image/label_image.py
2. 이미지 학습 및 tensorboard 실행
1) 이제 모든 재료가 준비가 되어있으니 아래 명령어를 입력하여 학습을 돌려주기만 하면 된다.
python retrain.py --image_dir D:/ML2/inception/flower_photos |
- 컴퓨터가 공부할 수 있는 시간을 기다려주자.
- 소스상에 학습되는 데이터는 소스코드가 있는 드라이버(D:) 의 tmp 폴더 하위에 만들어진다.
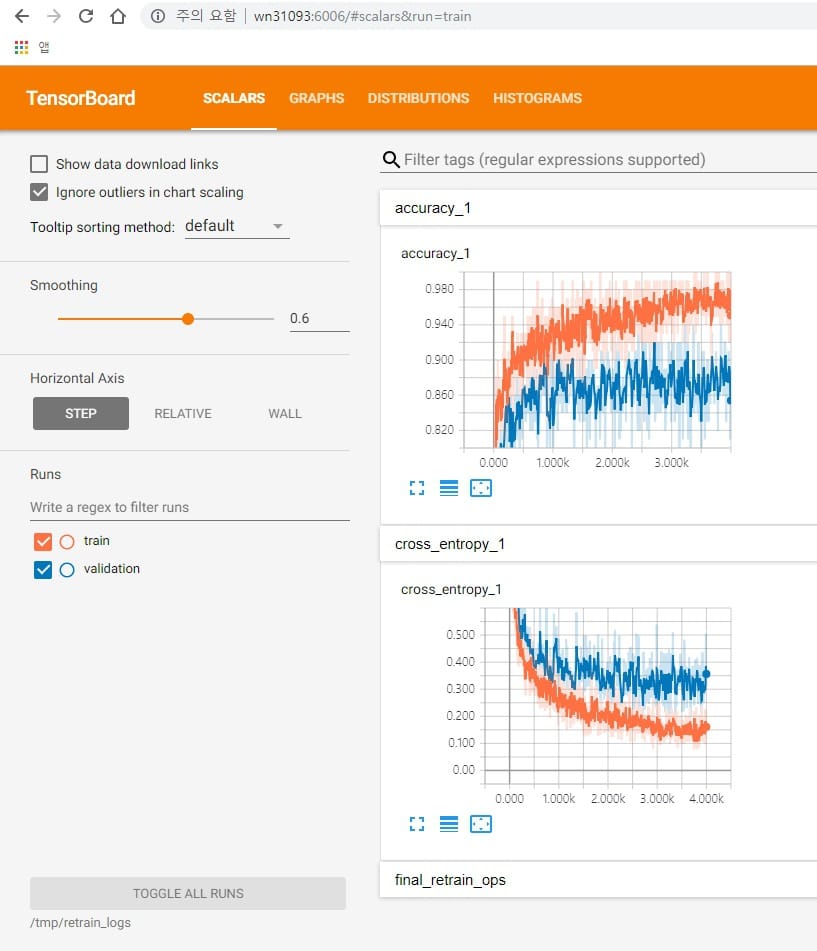
2) 학습 중간에 학습이 진행되는 과정을 보고자 하면 Tensorboard 를 실행하여 event 분석그래프를 보면 된다.
- 또다른 cmd창을 띄우고 아래 명령어를 실행하면 된다.
(event파일은 retrain_log 폴더 안에 있다 - 소스상에 그렇게 지정되어 있음)
tensorboard --logdir D:/tmp/retrain_logs |
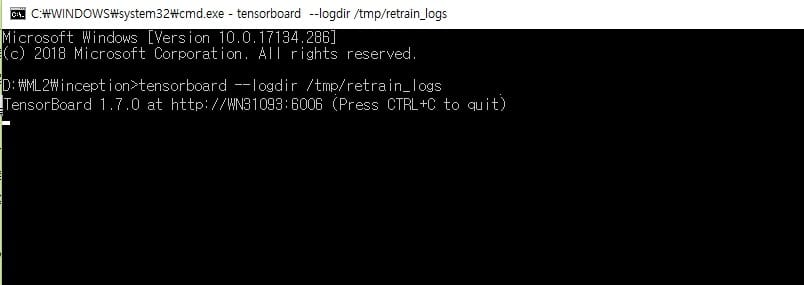
- 위에 tensorboard 서버가 실행되면 그 아래에 http로 시작하는 주소가 나온다.
브라우저를 실행하여 https://WN31093:6006 으로 접속해보자.
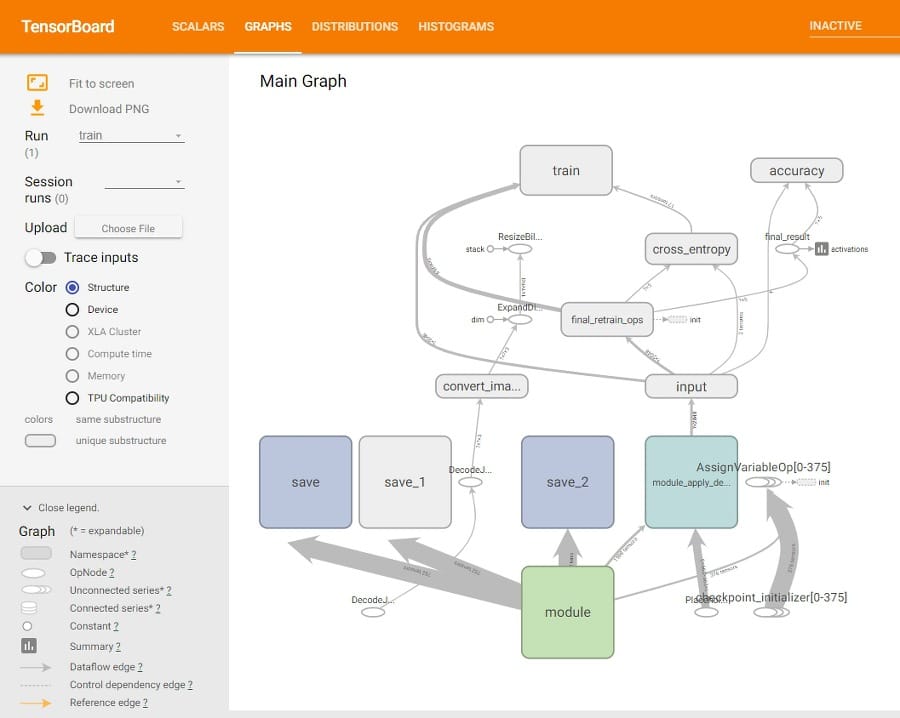
그러면 아래와 같이 가시적으로 분석가능한 화면이 나온다.
3) 학습결과
- 학습이 다 완료되면 D:/temp 하위에 output_graph.pb , output_labels.txt 파일이 생긴다.
- .pb 파일은 inception 내부에서 이미지를 판단하는 로직에 의해 flower_photos 하위에 있는 개별 이미지들을
학습한 결과 파일이며, output_labels.txt 는 분류를 적어놓은 text파일이다..
- 실제 하나의 테스트 이미지에서 여러가지 원하는 이미지를 동시에 인식시키기 위해서는
수기로 labeling을 하는 수고를 거쳐야 할 것이다. (직접 labeling 을 해보려면 라쿤예제가 있다..github 참고)
3. TEST실행
1) 기존에 학습하기위해 사용했던 이미지 중 임의의 이미지를 골라 TEST를 해본다.
아래는 기존에 사용했던 이미지 중 daisy 폴더안에 있는 이미지로 테스트를 하는 내용이다.

python label_image.py --graph=D:/tmp/output_graph.pb --labels=D:/tmp/output_labels.txt --input_layer=Placeholder --output_layer=final_result --image=D:/ML2/inception/flower_photos/daisy/21652746_cc379e0eea_m.jpg
- 그러면 아래와 같은 학습결과가 나온다.
D:\ML2\inception\example_code>python label_image.py --graph=D:/tmp/output_graph.pb --labels=D:/tmp/output_labels.txt --input_layer=Placeholder --output_layer=final_result --image=D:/ML2/inception/flower_photos/daisy/21652746_cc379e0eea_m.jpg
날짜.시간.892098: I T:\src\github\tensorflow\tensorflow\core\platform\cpu_feature_guard.cc:140] Your CPU supports instructions that this TensorFlow binary was not compiled to use: AVX2
날짜.시간.842399: I T:\src\github\tensorflow\tensorflow\core\common_runtime\gpu\gpu_device.cc:1344] Found device 0 with properties:
name: GeForce MX150 major: 6 minor: 1 memoryClockRate(GHz): 1.5315
pciBusID: 0000:01:00.0
totalMemory: 2.00GiB freeMemory: 1.62GiB
날짜.시간.859336: I T:\src\github\tensorflow\tensorflow\core\common_runtime\gpu\gpu_device.cc:1423] Adding visible gpu devices: 0
날짜.시간..973613: I T:\src\github\tensorflow\tensorflow\core\common_runtime\gpu\gpu_device.cc:911] Device interconnect StreamExecutor with strength 1 edge matrix:
날짜.시간..983104: I T:\src\github\tensorflow\tensorflow\core\common_runtime\gpu\gpu_device.cc:917] 0
날짜.시간..988281: I T:\src\github\tensorflow\tensorflow\core\common_runtime\gpu\gpu_device.cc:930] 0: N
날짜.시간..994075: I T:\src\github\tensorflow\tensorflow\core\common_runtime\gpu\gpu_device.cc:1041] Created TensorFlow device (/job:localhost/replica:0/task:0/device:GPU:0 with 1391 MB memory) -> physical GPU (device: 0, name: GeForce MX150, pci bus id: 0000:01:00.0, compute capability: 6.1)
날짜.시간..111074: I T:\src\github\tensorflow\tensorflow\core\common_runtime\gpu\gpu_device.cc:1423] Adding visible gpu devices: 0
날짜.시간..118736: I T:\src\github\tensorflow\tensorflow\core\common_runtime\gpu\gpu_device.cc:911] Device interconnect StreamExecutor with strength 1 edge matrix:
날짜.시간..127297: I T:\src\github\tensorflow\tensorflow\core\common_runtime\gpu\gpu_device.cc:917] 0
날짜.시간..133590: I T:\src\github\tensorflow\tensorflow\core\common_runtime\gpu\gpu_device.cc:930] 0: N
날짜.시간..139888: I T:\src\github\tensorflow\tensorflow\core\common_runtime\gpu\gpu_device.cc:1041] Created TensorFlow device (/job:localhost/replica:0/task:0/device:GPU:0 with 1391 MB memory) -> physical GPU (device: 0, name: GeForce MX150, pci bus id: 0000:01:00.0, compute capability: 6.1)
날짜.시간.078684: W T:\src\github\tensorflow\tensorflow\core\common_runtime\bfc_allocator.cc:219] Allocator (GPU_0_bfc) ran out of memory trying to allocate 1.91GiB. The caller indicates that this is not a failure, but may mean that there could be performance gains if more memory were available.
날짜.시간.887221: W T:\src\github\tensorflow\tensorflow\core\common_runtime\bfc_allocator.cc:219] Allocator (GPU_0_bfc) ran out of memory trying to allocate 1.41GiB. The caller indicates that this is not a failure, but may mean that there could be performance gains if more memory were available.
날짜.시간.904741: W T:\src\github\tensorflow\tensorflow\core\common_runtime\bfc_allocator.cc:219] Allocator (GPU_0_bfc) ran out of memory trying to allocate 1.69GiB. The caller indicates that this is not a failure, but may mean that there could be performance gains if more memory were available.
날짜.시간.923649: W T:\src\github\tensorflow\tensorflow\core\common_runtime\bfc_allocator.cc:219] Allocator (GPU_0_bfc) ran out of memory trying to allocate 1.98GiB. The caller indicates that this is not a failure, but may mean that there could be performance gains if more memory were available.
daisy 0.9976986
sunflowers 0.001372812
dandelion 0.0005049626
tulips 0.0003564248
roses 6.7078516e-05
- 위의 결과를 보면 daisy 가 0.9976986로 100%에 가까운 신뢰도를 가지므로
컴퓨터는 테스트 이미지가 daisy로 판단한다.
뭔가 지식을 얻어가셨나요?
#ai #인공지능 #이미지인식 #머신러닝 #TensorFlow


![[세입자]전세 계약 체크사항](/content/images/size/w600/2025/09/apartment.jpg)


