
AXBoot설치 - Windows10에서 개발환경 구성
axboot설치는 아래의 설치문서를 참고하면 되지만 본인이 설치하다 발생했던 문제들에 대한 조치들을 포함해서 정리해 보겠다.
- 설치문서 Link : https://api.axboot.com/install.html
1. 설치환경
1) OS : Windows10
2) jdk1.8
3) STS (Spring Tool Suite) - 3.9.4.RELEASE
4) Tomcat 8
5) axboot
2. 설치순서
1) 먼저 위의 설치문서를 참고하여 Git, node, bower를 모두 설치한다.
(설치는 간단하므로 생략, 단 nodejs는 무조건 Node.js 8.11.4 를 설치해야 된다. 그 이상 버전을 사용하면 안돌아감.)
2) MariaDB 10 설치 (기본적으로 H2 Database가 있기 때문에 궂이 설치안해도 됨. MariaDB를 이용하고자 하면 설치)
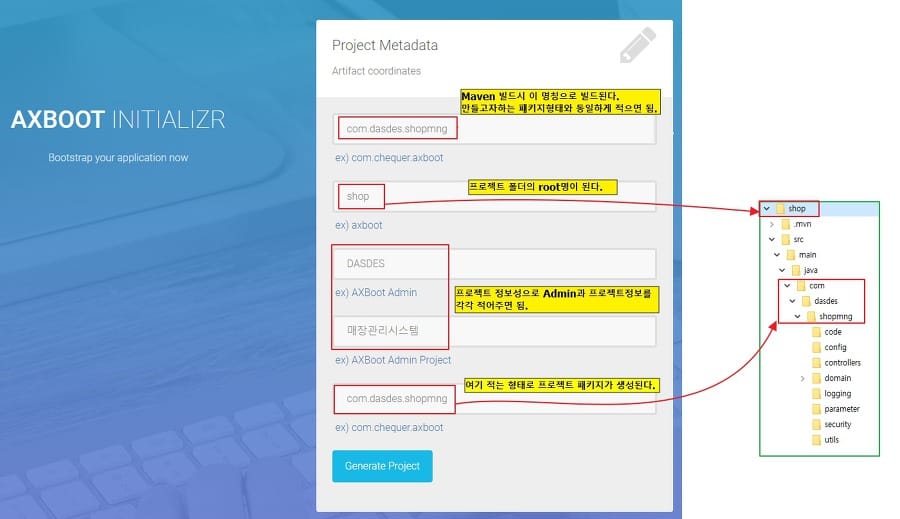
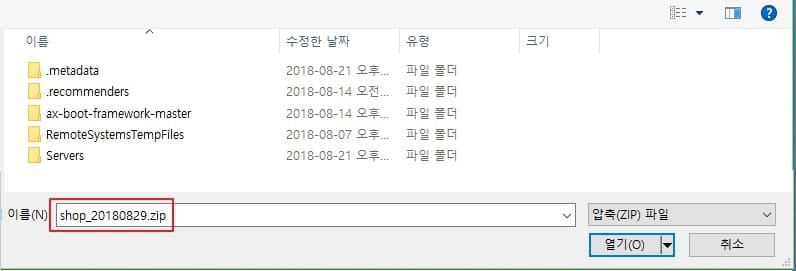
3) AXBoot Start 사이트( https://start.axboot.com )에 접속하여 최초 만들어주는 소스를 생성하여 다운로드 받아 압축을 푼다.
- 접속시 입력해야 될 정보들이 있는데 아래 기준으로 입력하면 된다.

- 위의 Generate Project 버튼을 클릭하면 아래와 같이 다운로드가 된다.
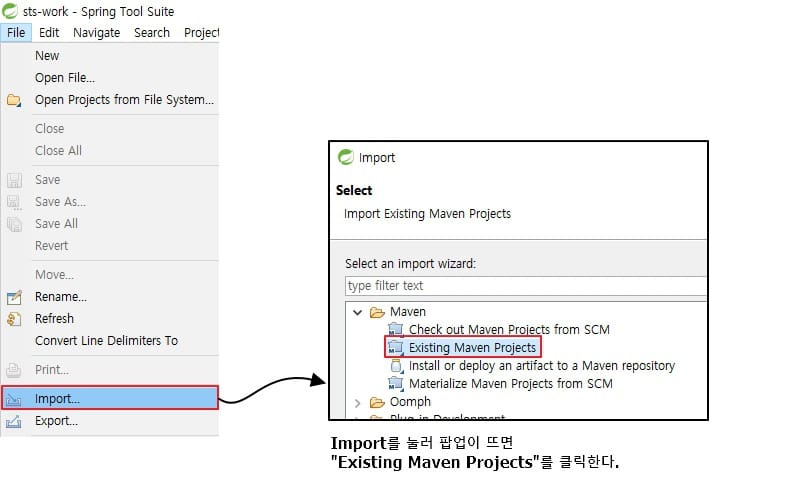
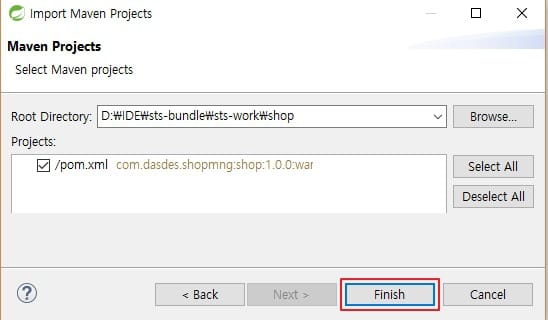
4) STS의 작업영역(workplace)에 위에서 압축을 푼 "shop"폴더를 복사 or 이동시킨 뒤 STS를 실행하여 프로젝트를 import한다.
a) file > import클릭 Existing Maven Projects 선택
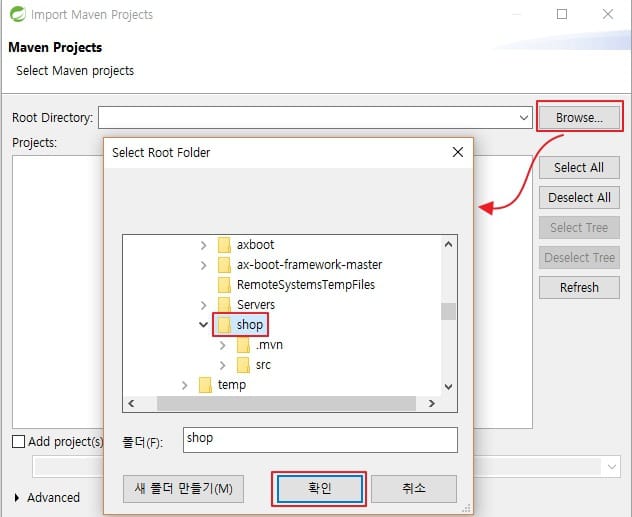
b) 이전에 압축을 풀었던 폴더를 검색하여 선택 후 종료한다.
4) 압축을 푼 shop폴더 안의 경로에서 관련 스크립트 모듈을 가져오기 위해 cmd창을 띄운 후 "npm install"을 입력 엔터친다.
- 아래와 같은 오류가 나올 수 있다
Microsoft Windows [Version 10.0.17134.228] (c) 2018 Microsoft Corporation. All rights reserved. D:\IDE\sts-bundle\sts-work\shop>npm install npm WARN deprecated babel-preset-es2015@6.24.1: ? Thanks for using Babel: we recommend using babel-preset-env now: please read babeljs.io/env to update! > node-sass@3.13.1 install D:\IDE\sts-bundle\sts-work\shop\node_modules\gulp-sass\node_modules\node-sass > node scripts/install.js Downloading binary from https://github.com/sass/node-sass/releases/download/v3.13.1/win32-x64-57_binding.node Cannot download "https://github.com/sass/node-sass/releases/download/v3.13.1/win32-x64-57_binding.node": HTTP error 404 Not Found Hint: If github.com is not accessible in your location try setting a proxy via HTTP_PROXY, e.g. export HTTP_PROXY=https://example.com:1234 or configure npm proxy via npm config set proxy https://example.com:8080 > node-sass@4.6.1 install D:\IDE\sts-bundle\sts-work\shop\node_modules\node-sass > node scripts/install.js Cached binary found at C:\Users\dasdes\AppData\Roaming\npm-cache\node-sass\4.6.1\win32-x64-57_binding.node > node-sass@3.13.1 postinstall D:\IDE\sts-bundle\sts-work\shop\node_modules\gulp-sass\node_modules\node-sass > node scripts/build.js Building: D:\Program Files\nodejs\node.exe D:\IDE\sts-bundle\sts-work\shop\node_modules\node-gyp\bin\node-gyp.js rebuild --verbose --libsass_ext= --libsass_cflags= --libsass_ldflags= --libsass_library= gyp info it worked if it ends with ok gyp verb cli [ 'D:\\Program Files\\nodejs\\node.exe', gyp verb cli 'D:\\IDE\\sts-bundle\\sts-work\\shop\\node_modules\\node-gyp\\bin\\node-gyp.js', gyp verb cli 'rebuild', gyp verb cli '--verbose', gyp verb cli '--libsass_ext=', gyp verb cli '--libsass_cflags=', gyp verb cli '--libsass_ldflags=', gyp verb cli '--libsass_library=' ] gyp info using node-gyp@3.6.2 gyp info using node@8.11.3 | win32 | x64 gyp verb command rebuild [] gyp verb command clean [] gyp verb clean removing "build" directory gyp verb command configure [] gyp verb check python checking for Python executable "python3.5" in the PATH gyp verb `which` failed Error: not found: python3.5 gyp verb `which` failed at getNotFoundError (D:\IDE\sts-bundle\sts-work\shop\node_modules\which\which.js:13:12) gyp verb `which` failed at F (D:\IDE\sts-bundle\sts-work\shop\node_modules\which\which.js:68:19) gyp verb `which` failed at E (D:\IDE\sts-bundle\sts-work\shop\node_modules\which\which.js:80:29) gyp verb `which` failed at D:\IDE\sts-bundle\sts-work\shop\node_modules\which\which.js:89:16 gyp verb `which` failed at D:\IDE\sts-bundle\sts-work\shop\node_modules\isexe\index.js:42:5 gyp verb `which` failed at D:\IDE\sts-bundle\sts-work\shop\node_modules\isexe\windows.js:36:5 gyp verb `which` failed at FSReqWrap.oncomplete (fs.js:152:21) gyp verb `which` failed python3.5 { Error: not found: python3.5 gyp verb `which` failed at getNotFoundError (D:\IDE\sts-bundle\sts-work\shop\node_modules\which\which.js:13:12) gyp verb `which` failed at F (D:\IDE\sts-bundle\sts-work\shop\node_modules\which\which.js:68:19) gyp verb `which` failed at E (D:\IDE\sts-bundle\sts-work\shop\node_modules\which\which.js:80:29) gyp verb `which` failed at D:\IDE\sts-bundle\sts-work\shop\node_modules\which\which.js:89:16 gyp verb `which` failed at D:\IDE\sts-bundle\sts-work\shop\node_modules\isexe\index.js:42:5 gyp verb `which` failed at D:\IDE\sts-bundle\sts-work\shop\node_modules\isexe\windows.js:36:5 gyp verb `which` failed at FSReqWrap.oncomplete (fs.js:152:21) gyp verb `which` failed stack: 'Error: not found: python3.5\n at getNotFoundError (D:\\IDE\\sts-bundle\\sts-work\\shop\\node_modules\\which\\which.js:13:12)\n at F (D:\\IDE\\sts-bundle\\sts-work\\shop\\node_modules\\which\\which.js:68:19)\n at E (D:\\IDE\\sts-bundle\\sts-work\\shop\\node_modules\\which\\which.js:80:29)\n at D:\\IDE\\sts-bundle\\sts-work\\shop\\node_modules\\which\\which.js:89:16\n at D:\\IDE\\sts-bundle\\sts-work\\shop\\node_modules\\isexe\\index.js:42:5\n at D:\\IDE\\sts-bundle\\sts-work\\shop\\node_modules\\isexe\\windows.js:36:5\n at FSReqWrap.oncomplete (fs.js:152:21)', gyp verb `which` failed code: 'ENOENT' } gyp verb could not find "python3.5". checking python launcher gyp verb check python launcher python executable found: "C:\\Users\\dasdes\\.windows-build-tools\\python27\\python.exe" gyp verb check python version `C:\Users\dasdes\.windows-build-tools\python27\python.exe -c "import platform; print(platform.python_version());"` returned: "2.7.14\r\n" gyp verb get node dir no --target version specified, falling back to host node version: 8.11.3 gyp verb command install [ '8.11.3' ] gyp verb install input version string "8.11.3" gyp verb install installing version: 8.11.3 gyp verb install --ensure was passed, so won't reinstall if already installed gyp verb install version not already installed, continuing with install 8.11.3 gyp verb ensuring nodedir is created C:\Users\dasdes\.node-gyp\8.11.3 gyp verb created nodedir C:\Users\dasdes\.node-gyp\8.11.3 gyp http GET https://nodejs.org/download/release/v8.11.3/node-v8.11.3-headers.tar.gz gyp WARN install got an error, rolling back install gyp verb command remove [ '8.11.3' ] gyp verb remove using node-gyp dir: C:\Users\dasdes\.node-gyp gyp verb remove removing target version: 8.11.3 gyp verb remove removing development files for version: 8.11.3 gyp ERR! configure error gyp ERR! stack Error: unable to verify the first certificate gyp ERR! stack at TLSSocket.<anonymous> (_tls_wrap.js:1105:38) gyp ERR! stack at emitNone (events.js:106:13) gyp ERR! stack at TLSSocket.emit (events.js:208:7) gyp ERR! stack at TLSSocket._finishInit (_tls_wrap.js:639:8) gyp ERR! stack at TLSWrap.ssl.onhandshakedone (_tls_wrap.js:469:38) gyp ERR! System Windows_NT 10.0.17134 gyp ERR! command "D:\\Program Files\\nodejs\\node.exe" "D:\\IDE\\sts-bundle\\sts-work\\shop\\node_modules\\node-gyp\\bin\\node-gyp.js" "rebuild" "--verbose" "--libsass_ext=" "--libsass_cflags=" "--libsass_ldflags=" "--libsass_library=" gyp ERR! cwd D:\IDE\sts-bundle\sts-work\shop\node_modules\gulp-sass\node_modules\node-sass gyp ERR! node -v v8.11.3 gyp ERR! node-gyp -v v3.6.2 gyp ERR! not ok Build failed with error code: 1 npm WARN axboot@2.0.0 No description npm WARN axboot@2.0.0 No repository field. npm WARN axboot@2.0.0 No license field. npm WARN optional SKIPPING OPTIONAL DEPENDENCY: fsevents@1.1.3 (node_modules\fsevents): npm WARN notsup SKIPPING OPTIONAL DEPENDENCY: Unsupported platform for fsevents@1.1.3: wanted {"os":"darwin","arch":"any"} (current: {"os":"win32","arch":"x64"}) npm ERR! code ELIFECYCLE npm ERR! errno 1 npm ERR! node-sass@3.13.1 postinstall: `node scripts/build.js` npm ERR! Exit status 1 npm ERR! npm ERR! Failed at the node-sass@3.13.1 postinstall script. npm ERR! This is probably not a problem with npm. There is likely additional logging output above. npm ERR! A complete log of this run can be found in: npm ERR! C:\Users\dasdes\AppData\Roaming\npm-cache\_logs\2018-08-29T04_12_41_712Z-debug.log |
- 해결방법 : shop폴더 하위에 package.json 파일을 열면 아래와 같이 나오는데 "gulp-sass": "^2.X.X" 부분이 형태로 되어있는데
이 버전을 "gulp-sass": "^3.1.0" 이걸로 바꾼 후 npm install을 하면 위 붉은색 에러는 사라진다.
package.json 파일
{ "version": "2.0.0", "name": "axboot", "engines": { "node": ">=0.10.0" }, "scripts": { "build": "babel assets/js -d lib", "postinstall": "node node_modules/bower/bin/bower install && gulp plugin-js" }, "devDependencies": { "babel-cli": "^6.0.0", "babel-preset-es2015": "", "bower": "^1.7.9", "fs-finder": "^1.8.1", "gulp": "*", "gulp-babel": "^6.1.2", "gulp-changed": "*", "gulp-clean": "^0.3.2", "gulp-concat": "*", "gulp-notify": "", "gulp-plumber": "", "gulp-replace": "", "gulp-sass": "^2.1.1", ==> "gulp-sass": "^3.1.0", 으로 수정 "gulp-shell": "^0.6.3", "gulp-sourcemaps": "", "gulp-uglify": "^1.5.1", "gulp-util": "*", "js-beautify": "^1.5.10", "markdown-it": "^8.1.0", "node-sass": "*", "strip-indent": "^2.0.0" } } |
그러나 이렇게 하고도 또 다른에러가 발생한다. 아래는 위와같이 수정 후 다시 npm install 하고 난 다음의 내용이다.
D:\IDE\sts-bundle\sts-work\shop>npm install > node-sass@4.9.3 install D:\IDE\sts-bundle\sts-work\shop\node_modules\gulp-sass\node_modules\node-sass > node scripts/install.js Cached binary found at C:\Users\dasdes\AppData\Roaming\npm-cache\node-sass\4.9.3\win32-x64-57_binding.node > node-sass@4.9.3 postinstall D:\IDE\sts-bundle\sts-work\shop\node_modules\gulp-sass\node_modules\node-sass > node scripts/build.js Binary found at D:\IDE\sts-bundle\sts-work\shop\node_modules\gulp-sass\node_modules\node-sass\vendor\win32-x64-57\binding.node Testing binary Binary is fine > axboot@2.0.0 postinstall D:\IDE\sts-bundle\sts-work\shop > node node_modules/bower/bin/bower install && gulp plugin-js bower ax5ui-media-viewer#>=1.3.0UNABLE_TO_VERIFY_LEAF_SIGNATURE Request to https://registry.bower.io/packages/ax5ui-media-viewer failed: unable to verify the first certificate npm ERR! code ELIFECYCLE npm ERR! errno 1 npm ERR! axboot@2.0.0 postinstall: `node node_modules/bower/bin/bower install && gulp plugin-js` npm ERR! Exit status 1 npm ERR! npm ERR! Failed at the axboot@2.0.0 postinstall script. npm ERR! This is probably not a problem with npm. There is likely additional logging output above. npm ERR! A complete log of this run can be found in: npm ERR! C:\Users\dasdes\AppData\Roaming\npm-cache\_logs\2018-08-29T04_38_30_882Z-debug.log D:\IDE\sts-bundle\sts-work\shop> |
UNABLE_TO_VERIFY_LEAF_SIGNATURE 라는 새로운 에러가 발생한것을 볼 수 있다.
- 해결방법 : shop 폴더 하위에 보면 .bowerrc 라는 파일을 열어 ,"strict-ssl": false 를 추가해서 ssl로 처리되지 않도록 한다.
.bowerrc 파일
{ "directory": "src/main/webapp/assets/plugins" ,"strict-ssl": false ==> 추가됨 } |
이런다음 npm install 시 정상적으로 모듇이 설치된다.
5) 다시 STS로 돌아와서 shop 폴더클릭 후 F5(새로고침)을 클릭시 node_modules 폴더가 생긴것을 볼 수 있다.(이미 생겨있었겠지만)
그러면 새로고침 이후에도 여러가지 에러를 볼 수 있다.
- 에러1 : node_module > config-chain > test > broken.json : missing 으로 시작하는 주석라인을 삭제한다.
{ "name": "config-chain", "version": "0.3.0", "description": "HANDLE CONFIGURATION ONCE AND FOR ALL", "homepage": "https://github.com/dominictarr/config-chain", "repository": { "type": "git", "url": "https://github.com/dominictarr/config-chain.git" }, ==> 콤마하나 추가해준다. //missing , and then this comment. this json is intensionally invalid ==> 이 라인을 삭제하면 에러가 없어짐. "dependencies": { "proto-list": "1", "ini": "~1.0.2" }, "bundleDependencies": ["ini"], "REM": "REMEMBER TO REMOVE BUNDLING WHEN/IF ISAACS MERGES ini#7", "author": "Dominic Tarr <dominic.tarr@gmail.com> (https://dominictarr.com)", "scripts": { "test": "node test/find-file.js && node test/ini.js && node test/env.js" } } |
- 에러2 : src > main > webapp > WEB-INF > layout > 하위에 있는
layout.tag, message.tag, page-button.tag 에서 에러발생
layout.tag 파일
<%@ tag language="java" pageEncoding="UTF-8" body-content="scriptless" %> <%@ tag import="com.chequer.axboot.core.utils.ContextUtil" %> <%@ taglib prefix="c" uri="https://java.sun.com/jsp/jstl/core" %> <%@ attribute name="name" required="true" %> <%@ attribute name="title" %> <%@ attribute name="script" fragment="true" %> <%@ attribute name="js" fragment="true" %> <%@ attribute name="css" fragment="true" %> <%@ attribute name="header" fragment="true" %> <%@ attribute name="buttons" fragment="true" %> 아래 두 줄을 추가해주면 에러가 발생하지 않는다. 첫줄은 본인이 만든 패키지 내부에 위치한다.(이라인까지 붙여넣지는 않겠지?) <%@ tag import="com.dasdes.shopmng.utils.CommonCodeUtils" %> <%@ tag import="com.chequer.axboot.core.utils.PhaseUtils" %> <c:choose> <c:when test="${name eq 'empty'}"> <%@ include file="layout/empty.tag" %> </c:when> <c:when test="${name eq 'base'}"> <%@ include file="layout/base.tag" %> </c:when> <c:when test="${name eq 'frame'}"> <%@ include file="layout/frame.tag" %> ==> 에러표시 </c:when> <c:when test="${name eq 'modal'}"> <%@ include file="layout/modal.tag" %> ==> 에러표시 </c:when> <c:when test="${name eq 'devTools'}"> <%@ include file="layout/devTools.tag" %> ==> 에러표시 </c:when> <c:otherwise> <%@ include file="layout/base.tag" %> ==> 에러표시 </c:otherwise> </c:choose> |
message.tag 파일
<%@ tag import="com.dasdes.shopmng.code.GlobalConstants" %> <%@ tag import="com.chequer.axboot.core.context.AppContextManager" %> <%@ tag import="com.chequer.axboot.core.utils.CookieUtils" %> <%@ tag import="com.chequer.axboot.core.utils.RequestUtils" %> <%@ tag import="com.chequer.axboot.admin.utils.SessionUtils" %> ==> 에러표시 ==> <%@ tag import="com.dasdes.shopmng.utils.SessionUtils" %> ==> 자기가 만든 패키지 명으로 수정 <%@ tag import="org.apache.commons.lang3.StringUtils" %> <%@ tag import="org.springframework.context.MessageSource" %> <%@ tag import="java.util.Locale" %> <%@ tag language="java" pageEncoding="UTF-8" body-content="empty" %> <%@ attribute name="code" required="true" %> <%@ attribute name="arguments" %> |
page-button.tag 파일
<%@ tag import="com.chequer.axboot.core.utils.MessageUtils" %> <%@ taglib prefix="c" uri="https://java.sun.com/jsp/jstl/core" %> <%@ taglib prefix="ax" uri="https://www.springframework.org/tags/form" %> ==> 에러표시 ==> 이 부분을 주석처리해주면 아래에러는 없어짐. prefix동일 ==> 이렇게 <!-- <%@ taglib prefix="ax" uri="https://www.springframework.org/tags/form" %> --> <%@ tag language="java" pageEncoding="UTF-8" body-content="scriptless" %> <%@ attribute name="function3Label" required="false" %> <%@ attribute name="function4Label" required="false" %> <%@ attribute name="function5Label" required="false" %> <%@ taglib prefix="ax" tagdir="/WEB-INF/tags" %> ==> 에러표시
|
6) 프로젝트의 pom.xml 의 <dependencies> 에 아래를 추가해준다.
<dependency> <groupId>org.springframework.boot</groupId> <artifactId>spring-boot-starter</artifactId> </dependency> <!-- https://mvnrepository.com/artifact/org.mariadb.jdbc/mariadb-java-client --> <dependency> <groupId>org.mariadb.jdbc</groupId> <artifactId>mariadb-java-client</artifactId> <version>1.4.6</version> </dependency>
<!-- https://mvnrepository.com/artifact/xalan/serializer --> <dependency> <groupId>xalan</groupId> <artifactId>serializer</artifactId> <version>2.7.2</version> </dependency>
<!-- https://mvnrepository.com/artifact/xalan/xalan --> <dependency> <groupId>xalan</groupId> <artifactId>xalan</artifactId> <version>2.7.2</version> </dependency> |
- 에러를 다 잡고 나서 Maven update를 해준다.
- 실행시 각각 라이브러리 jar파일이 해당위치에 없다고 에러가 나는 경우가 있는데 대충 xalan, serializer 의 jar(버전표시)본을
파일명 바꿔서 에러메시지의 안보인다는 폴더안에 에러메시지가 원하는 형태로 넣어주자.
7) tomcat 서버에 추가 및 실행
- tomcat서버 오른쪽 클릭 후 툴팁메뉴의 add and Remove 버튼클릭 후 해당 shop resource를 추가한다.
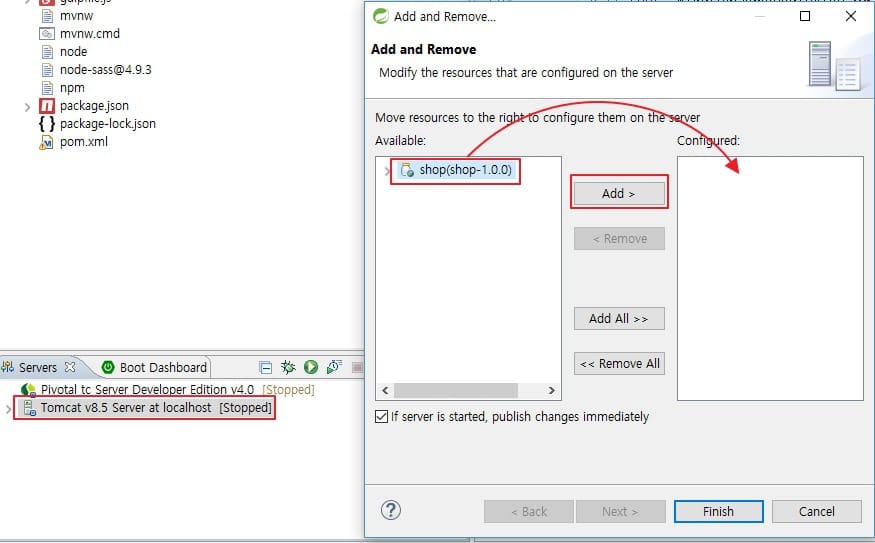
- 이렇게 하고 프로젝트(shop)에서 오른쪽 클릭 후 Run AS > Spring Boot App 클릭하여 서버를 구동시키면,
아래와 같은 에러가 나올 수 있다.
[main] ERROR org.springframework.boot.SpringApplication:reportFailure:815 Application startup failed org.springframework.context.ApplicationContextException: Unable to start embedded container; nested exception is java.lang.NoSuchMethodError: org.apache.catalina.Context.addServletMapping(Ljava/lang/String;Ljava/lang/String;)V at org.springframework.boot.context.embedded.EmbeddedWebApplicationContext.onRefresh(EmbeddedWebApplicationContext.java:137) at org.springframework.context.support.AbstractApplicationContext.refresh(AbstractApplicationContext.java:536) at org.springframework.boot.context.embedded.EmbeddedWebApplicationContext.refresh(EmbeddedWebApplicationContext.java:122) at org.springframework.boot.SpringApplication.refresh(SpringApplication.java:737) at org.springframework.boot.SpringApplication.refreshContext(SpringApplication.java:370) at org.springframework.boot.SpringApplication.run(SpringApplication.java:314) at org.springframework.boot.SpringApplication.run(SpringApplication.java:1162) at com.dasdes.shopmng.AXBootApplicationInitializer.main(AXBootApplicationInitializer.java:19) Caused by: java.lang.NoSuchMethodError: org.apache.catalina.Context.addServletMapping(Ljava/lang/String;Ljava/lang/String;)V at org.springframework.boot.context.embedded.tomcat.TomcatEmbeddedServletContainerFactory.addServletMapping(TomcatEmbeddedServletContainerFactory.java:279) at org.springframework.boot.context.embedded.tomcat.TomcatEmbeddedServletContainerFactory.addDefaultServlet(TomcatEmbeddedServletContainerFactory.java:259) at org.springframework.boot.context.embedded.tomcat.TomcatEmbeddedServletContainerFactory.prepareContext(TomcatEmbeddedServletContainerFactory.java:215) at org.springframework.boot.context.embedded.tomcat.TomcatEmbeddedServletContainerFactory.getEmbeddedServletContainer(TomcatEmbeddedServletContainerFactory.java:178) at org.springframework.boot.context.embedded.EmbeddedWebApplicationContext.createEmbeddedServletContainer(EmbeddedWebApplicationContext.java:164) at org.springframework.boot.context.embedded.EmbeddedWebApplicationContext.onRefresh(EmbeddedWebApplicationContext.java:134) ... 7 common frames omitted |
- 해결방법1 : lombok 라이브러리가 없어서 나는 에러이다. lombok은 에너테이션을 이용해서 자동으로 setter와 getter메소드를
만들어주는 라이브러리다.
https://projectlombok.org/download 를 클릭하여 jar파일을 다운로드한다.(적당한 위치에 보관)
그런다음 shop프로젝트 오른쪽 클릭>properties 클릭 --> 팝업창의 왼쪽 ㅓjava build path클릭 --> 오른쪽 Library 탭에서
방금 다운로드 받은 lombok.jar파일을 추가(Add external jar버튼 이용)한다.
- 해결방법2 : pom.xml <dependencies>하위에 추가한다. (위에서 추가해놓지 왜 지금 나오나? ==> lombok 설명하려고..)
<!-- https://mvnrepository.com/artifact/org.projectlombok/lombok --> <dependency> <groupId>org.projectlombok</groupId> <artifactId>lombok</artifactId> <version>1.18.4</version> <scope>provided</scope> </dependency> |
라이브러리 추가 후 서비를 다시 기동해본다.
서버기동방법은 shop폴더 하위에서 cmd창을 열어 "mvn spring-boot:run" 입력해도 됨.
8) 웹접속 및 초기DB셋팅
- DB설정파일 위치 : shop\src\main\resources\axboot-local.properties
==> 기본적으로 설치되는 DB는 h2로 DB로 따로 설치하지 않아도 되는 임베디드DB로 기본적인 table이 만들어지게 된다.
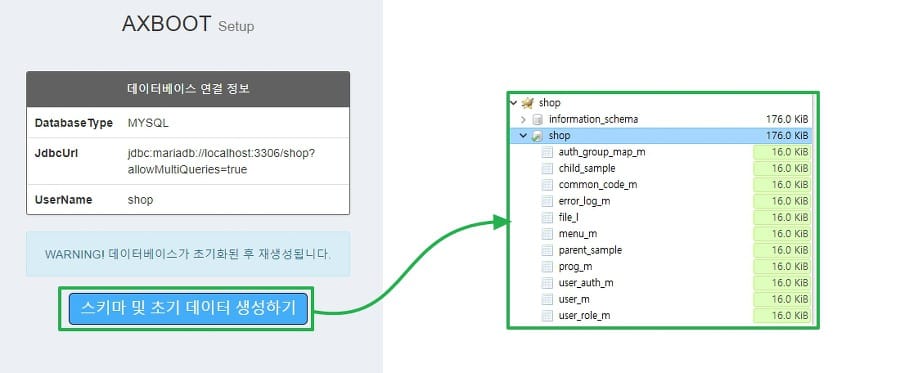
- 접속 및 DB자동셋팅
==> https://localhost:8080 으로 브라우저에서 접속 후 "스키마 및 초기데이터 생성하기"버튼을 클릭하면
자동으로 기본적인 테이블을 만들어준다.

※ 참고 - MariaDB를 사용하고자 할 때 설정
a) 먼저 MariaDB에 shop이라는 database를 만들고, 접속 id/pwd를 shop/shop으로 만들어 놓는다.
b) DB설정파일(axboot-local.properties)을 아래와 같이 설정한다.
//axboot.dataSource.username=sa //axboot.dataSource.password= //axboot.dataSource.url=jdbc:h2:~/axboot/axboot/db //axboot.dataSource.driverClassName=org.h2.Driver //변경할 부분 5개 라인 (MariaDB 드라이버는 위 dependency에 미리 추가해 놨음) axboot.dataSource.username=shop axboot.dataSource.password=shop axboot.dataSource.url=jdbc:mariadb://localhost:3306/shop?allowMultiQueries=true axboot.dataSource.driverClassName=org.mariadb.jdbc.Driver axboot.dataSource.initialSize=5 axboot.dataSource.maxIdle=-1 axboot.dataSource.maxTotal=10 axboot.dataSource.maxWaitMillis=3000 axboot.dataSource.slowQueryThreshold=3000 axboot.dataSource.hibernate.hbm2ddlAuto=none //axboot.dataSource.hibernate.databaseType=h2 axboot.dataSource.hibernate.databaseType=MYSQL axboot.log.level=ERROR axboot.log.slack.enabled=false axboot.log.slack.webHookUrl= axboot.log.slack.channel=error_logs axboot.log.database.enabled=true axboot.log.adminUrl= axboot.upload.repository=/Workspace/tempDir |
c) 다시 서버를 기동하고 https://localhost:8080으로 접속시 MariaDB에 Table이 생성된다.
만족하셨나요? ~~~~~~~
#axboot설치 #axisj #full stack framework #axboot 환경구성 #axboot강좌


![[세입자]전세 계약 체크사항](/content/images/size/w600/2025/09/apartment.jpg)


